Here you will find these topics:
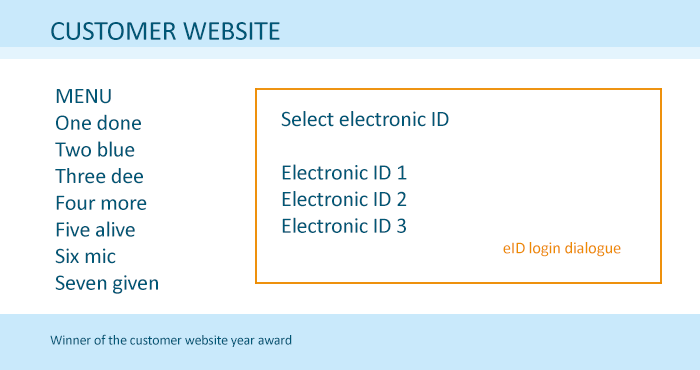
There are three different user presentation modes in E-Ident: pop-up, standalone and
embedded. The E-Ident service displays the user interface in either of these modes.
Pop-up user interface
The pop-up option allows customers to present E-Ident service UI in a window partly covering their own web UI. This is modern and recommended option, giving the best user experience on both desktop and mobile devices.
Note: On mobile devices, the window will cover the entire screen.
Here is a sample of how it looks:
A simple pop-up can be setup with similar JavaScript code as below. The pop-up has to be opened by a user action. The example assumes that a button with id “open-popup-button” is used to start the identification flow.
<script>
  document.addEventListener("DOMContentLoaded", function() {
    document.getElementById("open-popup-button").addEventListener("click", openCenteredPopup);
  });

  window.addEventListener("focus", keepPopupInFocus);
  window.addEventListener("click", keepPopupInFocus); // Workaround for Firefox

  let popup;

  function keepPopupInFocus() {
    if (popup && !popup.closed) {
      popup.focus();
    }
  }

  function openCenteredPopup() {
    let width = 800;
    let height = 700;
    let x = window.outerWidth/2 - width/2 + window.screenX;
    let y = window.outerHeight/2 - height/2 + window.screenY;
    openPopup(x, y, width, height);
  }

  function openPopup(x, y, width, height) {
    popup = window.open("<eidentUrl>", "eident", "width=" + width + ",height=" + height + ",top=" + y + ",left=" + x);
  }
</script>
In the page given by redirect_uri parameter, closing the pop-up can be done with similar JavaScript code as below. The returned parameters like authorisation code or error message are in this example returned to the customer’s page in the main window.
<script>
  window.opener.location.href = "<get token url>" + window.location.search;
  window.close();
</script>
<get token url> is meant to be replaced by a URL for a page on the customer side that will call our token endpoint.
Standalone user interface
As the name indicates, Standalone UI is designed to "stand alone on its own feet". This UI may in some cases be easiest implementation choice, as all identification UI will be handled separated at nets.eu. You will not have to make a lot of integration on you own web site, just forward the user to E-Ident, and our service will make sure the user is returned back to your site after completed authentication.
Note: You may not embed E-Ident standalone UI into an iframe on your own page.
To access the standalone UI, the following URL can be used (for customer test):
https://www.ident-preprod1.nets.eu/its/index.html?scope=openid&response_type=code&client_id=<clientid>&redirect_uri=<redirect_uri>&state=<state>&nonce=<nonce>
The resulting page from the above URL does not require any further styling from you i.e. the end user can be directly taken to the standalone user interface E-Ident URL. Your logo and information text are set upon configuration in E-Ident.
Embedded user interface
As the name indicates, Embedded UI allows the customer to embed the identification page into a customer controlled web page. This will allow you to show the users an interface that the users are familiar with and which is associtated with your company and service.
Note: Embedded UI is no longer recommended due to various browser security restrictions when using iframe with content from a different origins than the page itself. Customer with existing services utilizing Embedded UI should consider migrating over to Pop-up UI which will give a much better user experience and flexibility.
To access the embedded UI, the following URL can be used (for customer test):
https://www.ident-preprod1.nets.eu/its/index.html?scope=openid&response_type=code&client_id=<clientid>&redirect_uri=<redirect_uri>&state=<state>&nonce=<nonce>&wi=r
Note: The parameter
wi is set with the value
r for embedded user interface.
The page that is returned by the above URL can be styled with your own look-and-feel to fit your web UI. One example is to display the response from embedded UI E-Ident URL into an iframe in the customer’s web UI.
A simple iframe can be setup with similar HTML code as below.
 <iframe name="E-Ident"
     src="https://www.ident-preprod1.nets.eu/its/index.html?scope=openid&response_type=code&client_id=<clientid>&redirect_uri=<redirect_uri>&state=<state>&nonce=<nonce>&wi=r"
     height="512" width="640">
 </iframe>
CSS styling
All CSS style elements from the CSS can be customized through the
embedded UI. The default E-Ident CSS file can be downloaded from here: https://www.ident.nets.eu/idpp/css/default.css.
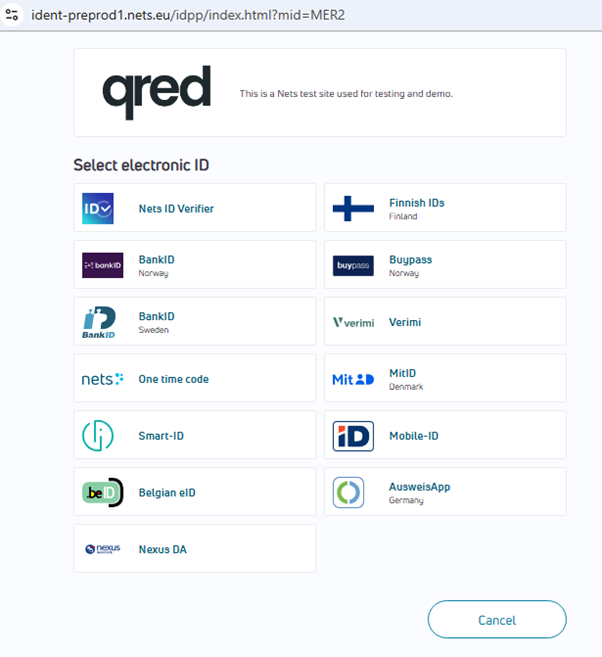
eID selection page
E-Ident displays the eID selection page if the customer supports more than one eID. This page is skipped if there is only one valid eID for the current request (see description above for usage of identification request parameters).

| BODY: iframe | HTML body tag (root element for styling) | Width: 100% |
| DIV: ipage | Page parent tag contains all other content items. | |
| SPAN: headerPki #h2 | HTML span tag with h2 as CSS id and headerPki as class. | |
| FORM | A form houses all listed eIDs. | |
|
INPUT: idpchoice #pki<1> | Each eID provider element is an HTML input tag with pki<eID provider number> as CSS id. | |
Status page
The status page is shown when an unexpected event occurs if you are using the SAML protocol and have not set the status URL.
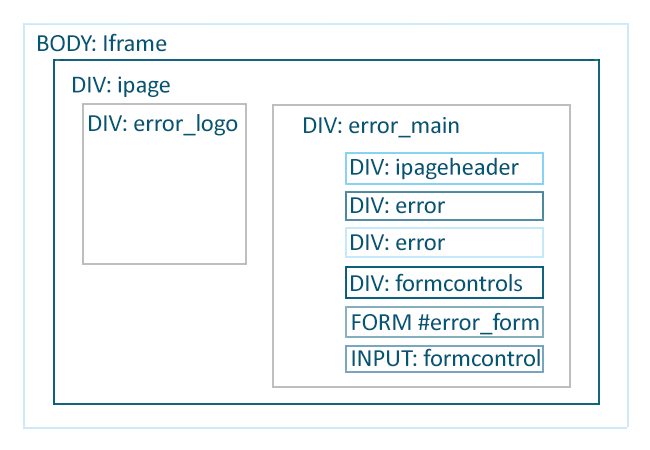
| DIV: error_logo | Icon next to status message |
| DIV: error_main | Container for error messages and buttons |
| DIV: ipageheader | Message heading just above the status message (some messages do not have headings) |
| DIV: error | Status message text |
| DIV: formcontrols | Form control elements (input buttons and submit buttons) |
| FORM #error_form | Form for input buttons |
CSS style sheet elements
List o the general style sheet elements. In addition, there are some eID specific elements. Those can be seen in the default CSS.
| .iframe | This class is assigned to all HTML body tags in E-Ident |
| .ipage | Each page has a master div tag with an ipage class |
| .idpchoice | The eID provider selection page displays each eID as a form button. Each button uses this class |
| .idpchoice:hover, .idpchoice_hover | Class used for eID choices that are in focus (onMouseOver) |
| .form_a | HTML links within a form |
| .formcontrols | Parent class for form controls (all form controls are placed within a single div using this class) |
| .formcontrol | Each form control is assigned this class |
| .formcontrol:hover | Class used for form controls that are in focus |
| .error_main | Alert box for displaying status messages |
| .error | Status message or error message |
| .error_logo | Icon next to status message |
| .info | Info box |
| #h0 #h1 #h2 #h3 #h4 | Heading text classes (number grows as the heading size decreases. Normal heading size is h3) |
| #t0 #t1 #t2 #t3 #t4 | Normal text classes (number grows as the text size decreases. Normal text size is t3) |
| #w0 #w1 #w2 #w3 #w4 | Warning text classes (number grows as the warning size decreases. Normal text size is w3) |
| #n0 #n1 #n2 #n3 #n4 | Highlighted text classes (number grows as the highlight text size decreases. Highlight text size is n3) |
| .main | Main container for page |
| .ipageheader | Header inside iframe |
| .logo | eID logo container |
| .formheader | Header inside form |
| .status | Status messages inside form |
| .info_body | DIV container for information to the user and input fields. |
| .body | Information text |
Recommended IFRAME sizes
| BankID (NO) | 400 x 280 |
| BankID on mobile phones (NO) | 480 x 280 (regular GUI will be shown) 479 (or lower) x 280 (a smaller, responsive GUI will be shown)
|
BankID (SE)
| 450 x 380
|
Customer controlled user interface
Above, the three different user interface options for E-Ident has been described. There is also a possibility to use parameters appended to the identification request to control the user experience for some eIDs.
eID selection page
As a customer you may choose to create your own eID selection page. You can choose to display the eID name and the logo or similar on your own page. When the user selects the eID on your page, you need to append the
amr_values (OIDC) or
forcepkivendor (SAML) parameter to the identification request. Links to logo files can be found on the eID specific page.
See below for more information about the eID selection page.

eID specific user interface parameters
- Finnish Bank IDs:
- Norwegian BankID on mobile:
eID selection page
For customers enabled with more than one eID, end users can choose between the available eIDs.
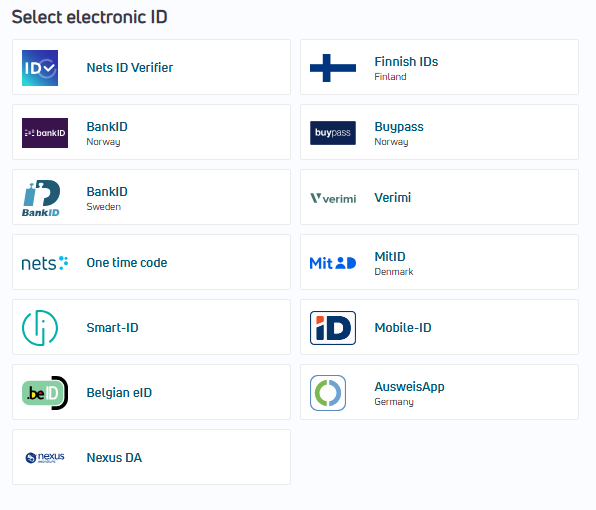
The eID selection page pictured above is an illustration of the UI of standalone and pop-up presentation modes.
The default order of eIDs is as given in the picture above. Only those eIDs that are configured on your configuration will be displayed, but then in the order as above.
Both the order and the set of eIDs can be modified using the
amr_values and
forcepkivendor parameter for OIDC and SAML identification requests respectively. The order the eIDs are listed when using the parameter is the order the eIDs will be displayed. The parameter may consist of all or just some of the eIDs configured on your E-Ident configuration. It is only the eIDs listed that will be displayed. If there is only one value, the page will not be shown and the end user is routed directly to the specified eID's identification page.
Status page (only when using the SAML protocol)
Whenever an unexpected event occurs, a status page with a status message can be displayed to the end user. The status message provides the end user with a simple explanation of the cause. Sometimes a suitable remedial action is also provided. The default status page is provided by E-Ident. This can be overridden by providing a custom status page URL. The status page URL can be set either in the customer configuration or in the
status parameter sent in the identification request.

Note: For the OIDC protocol, the user is directed to the customer's redirect_uri with two parameters; an error_description and an error with an error code.
E-Ident in apps
E-Ident requires a web browser, so a native app will need a browser component to integrate it. The easiest way to implement this is to add a web view component to the app. On iOS you can use WkWebView, on Android you can use the standard WebView.
These classes allow you to intercept the HTTP requests. So in the
OpenID Connect flow, you can intercept the redirect after authentication. This contains the authorization code, which you can extract and then send to your own backend system. Your backend can then retrieve the ID token from E-Ident. In the PKCE flow, it will also be possible to retrieve the ID token directly from a native app. Using
SAML flow is also possible.
Example iOS code which intercepts the auth code and displays it in the web view and example Android code using SAML:
import android.app.Activity;
import android.graphics.Color;
import android.net.UrlQuerySanitizer;
import android.os.Bundle;
import android.webkit.WebResourceRequest;
import android.webkit.WebResourceResponse;
import android.webkit.WebView;
import android.webkit.WebViewClient;


import java.io.ByteArrayInputStream;
import java.io.InputStream;

public class MainActivity extends Activity {
    @Override
    protected void onCreate(Bundle savedInstanceState) {
        super.onCreate(savedInstanceState);
        setContentView(R.layout.activity_main);
        WebView webView = prepareWebView();
        webView.loadUrl("https://www.ident-preprod1.nets.eu/its/index.html?mid=MER2&TARGET=test&wi=r");
    }


    private WebView prepareWebView() {
        WebView webView = findViewById(R.id.webview);
        webView.setWebViewClient(new WebViewClient() {

            @Override
            public boolean shouldOverrideUrlLoading(WebView view, WebResourceRequest request) {
                return false;
            }

            @Override
            public WebResourceResponse shouldInterceptRequest(WebView view, WebResourceRequest request) {
                UrlQuerySanitizer sanitiser = new UrlQuerySanitizer(request.getUrl().toString());
                if (sanitiser.hasParameter("TARGET") && sanitiser.hasParameter("urt")) {

                    runOnUiThread(() -> {
                        findViewById(R.id.bg).setBackgroundColor(Color.GREEN);
                    });

                    StringBuilder content = new StringBuilder("<html><body>");
                    content.append("<html><body><h1>OK!</h1>");
                    content.append("<p><b>SAML Artifact:</b><br/>").append(sanitiser.getValue("urt")).append("</p>");
                    content.append("<p><b>Resolver URL:</b><br/>").append(request.getUrl().toString()).append("</p>");
                    content.append("</body></html>");

                    InputStream data = new ByteArrayInputStream(content.toString().getBytes());
                    return new WebResourceResponse("text/html", "UTF-8", data);
                }
                return super.shouldInterceptRequest(view, request);
            }

        });
        webView.clearCache(true);
        webView.clearHistory();
        return webView;
    }
}
import UIKit
import WebKit
import SwiftUI

class WebViewController: UIViewController, WKNavigationDelegate {

    var webView: WKWebView!

    override func loadView() {
        webView = WKWebView()
        webView.navigationDelegate = self
        view = webView

        let url = URL(string: "https://www.ident-preprod1.nets.eu/its/index.html?client_id=MER2&scope=openid&response_type=code&redirect_uri=https://www-dev-ident.bbsas.no/ti2_merchant/return.html?env=preprod&wi=r&amr_values=no_bankid")!
        webView.load(URLRequest(url: url))
    }

    func webView(_ webView: WKWebView, decidePolicyFor
          navigationAction: WKNavigationAction,
          decisionHandler: @escaping (WKNavigationActionPolicy) -> Swift.Void) {

        let url = navigationAction.request.url!
        print("url: ", url.absoluteString)

        let c = URLComponents(url: url, resolvingAgainstBaseURL: false)
        let code = c?.queryItems?.first(where: { $0.name == "code" })?.value

        if let c = code {
               //do stuff
            print("code: ", c)

            //this tells the webview to cancel the request
            decisionHandler(.cancel)

            let header = "<head><meta name='viewport' content='width=device-width, initial-scale=1.0, maximum-scale=1.0, minimum-scale=1.0, user-scalable=no'></head>"

            let body = "<h1>Got code</h1><p>code: " + c + "</p>"

            webView.loadHTMLString(header + body, baseURL: nil)
            return
       }

       //this tells the webview to allow the request
       decisionHandler(.allow)

   }

}
Language support
E-Ident supports the following languages:
- English
- Norwegian (both "bokmål" and "nynorsk" )
- Swedish
- Danish
- Finnish
German (de_DE)
Estonian (et_EE)
Lithuanian (lt_LT)
Latvian (lv_LV)
The standalone UI supports all these by default, but the customer may be set up with only a subset of the languages. This is set upon customer configuration.
Contact support to update your language configuration if you use standalone UI.
The language presented to the end user is based on these criteria:
- If the
ui_locales (OIDC) or the
locale (SAML) parameter is added to the identification request, the language specified as the value will be presented to the end user.
- If the language parameter is not used, the language in the end user's web browser are presented.
- If no supported languages are available in the browser or the language parameter is not used, then English as default will be displayed.
Read more about the
ui_locales parameter under the
Optional identification parameters for OIDC and the
locale parameter under the
Optional identification parameters for SAML.